

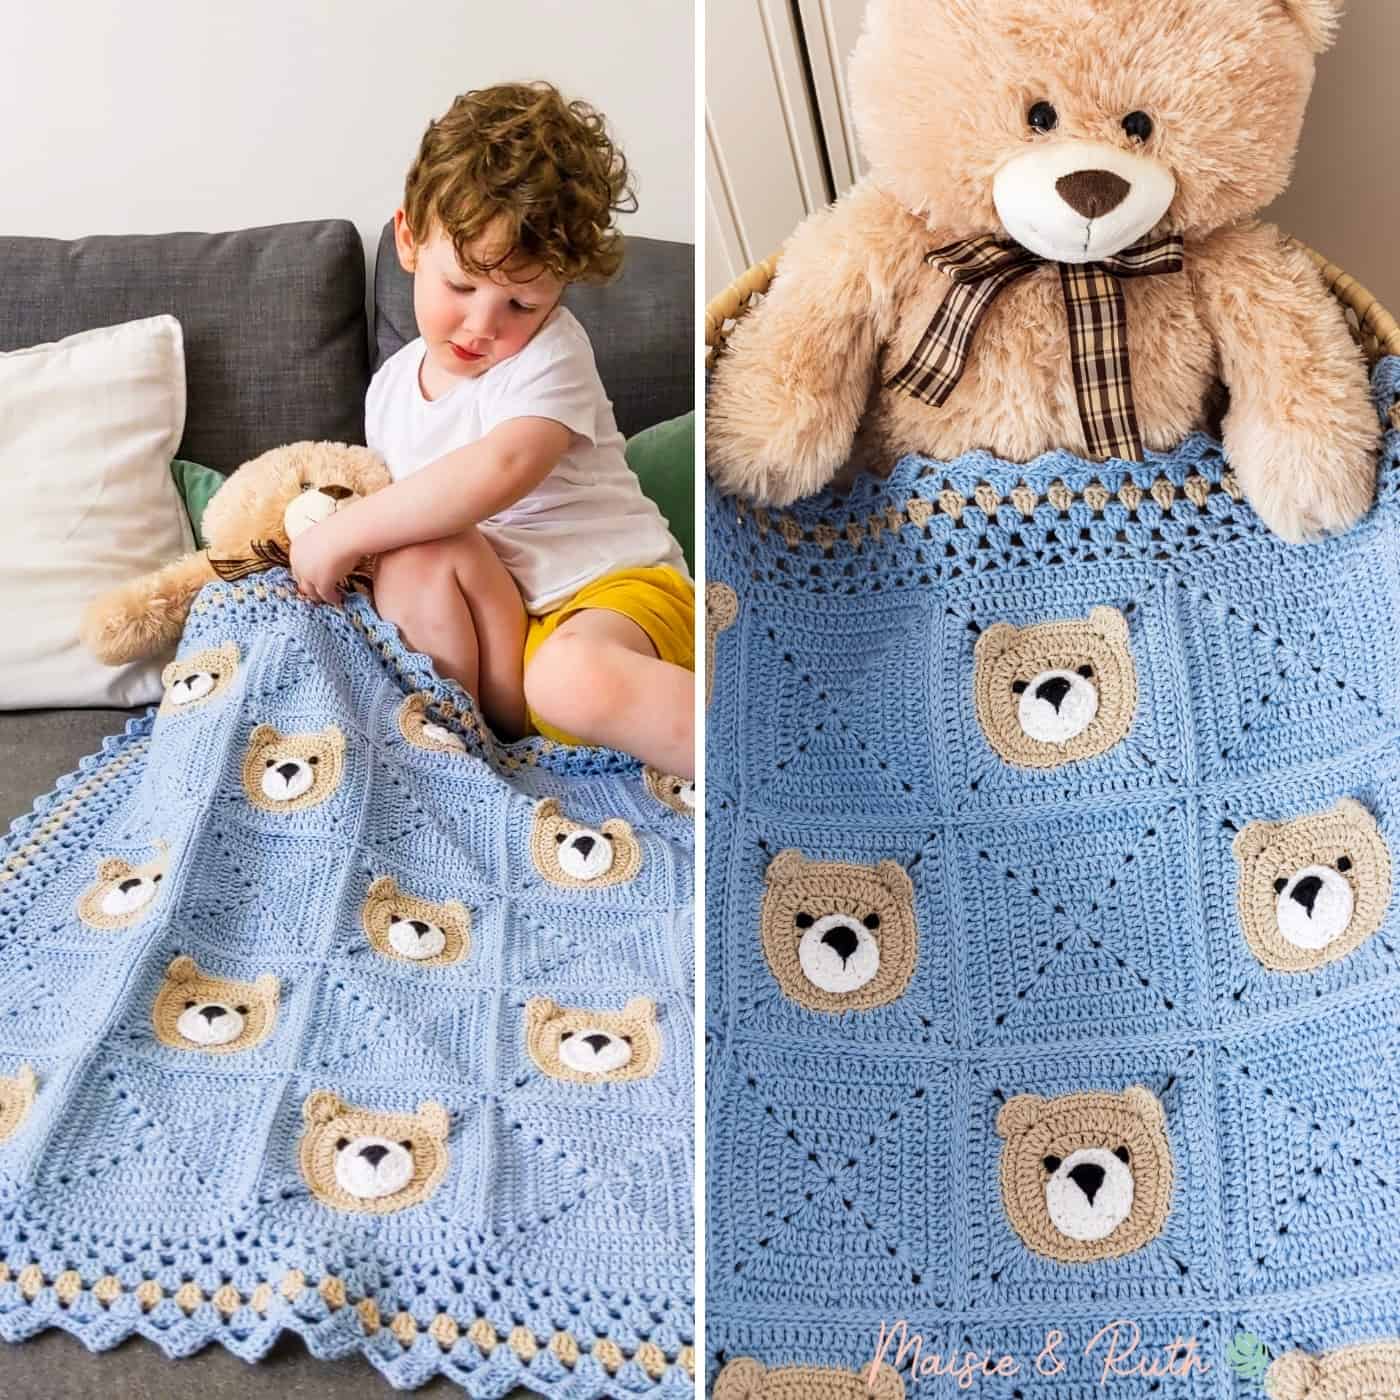
Keep baby all snuggly under this adorable bear crochet baby blanket!
This post for a bear crochet baby blanket may contain affiliate links, which means I’ll receive a commission if you purchase through my links, at no extra cost to you. Please read full disclosure for more information.
I really love crocheting baby blankets and whether you want to make this blanket for your own baby, gift it to someone else or donate it to charity, you’re sure to enjoy this fun crochet project!
It’s also easy and doesn’t take that much time to work up either.
PROFESSIONAL FINISH
After I completed the blanket, I blocked it by using the steam from my iron.
I didn’t use any pins – I just patted and smoothed it over with my hands.
You can see a little snippet of how I did this in the video tutorial below (you can jump immediately to this section by clicking on the timestamp in the description box).
Bear Crochet Baby Blanket on light wood table
SUPER CUTE BABY SET
This bear crochet baby blanket is part of a baby set.
There’s a baby onesie, matching baby booties, a bear rattle / teether, and a sweet little pixie bonnet.
The free patterns for all of these other items are on the blog. And they come with video tutorials too 😊
They’re all quick and easy projects, and would make lovely gifts for a new arrival or baby shower.
YARN USED
For this blanket I used Hobbii Rainbow Cotton 8/6, which is a 100% cotton yarn.
It’s a wonderfully soft cotton yarn with a luxurious drape.
On their website, Hobbii classify this yarn as a #2 / sport / 4 ply yarn but I would say it’s more of a #3 / DK / 8 ply yarn.
I really enjoy using this yarn and they have an extensive choice of colours on their website (over 100!).

Bear Crochet Square
SUBSTITUTE YARN
I’ve also worked this blanket up using Paintbox Yarns Cotton DK.
This is also a 100% cotton yarn and it’s a real joy to work with – no splitting and has a lovely silky finish to it.
Again, like the Hobbii yarn, there’s an enormous selection of colours on offer – you’ll certainly be spoilt for choice!
Bear Crochet Baby Blanket Teddy on floor beside bassinet
If you’re ready to learn how to make this super cute bear crochet baby blanket, let’s head to the free pattern now!
BEAR CROCHET BABY BLANKET: A FREE PATTERN
This post for a bear crochet baby blanket may contain affiliate links, which means I’ll receive a commission if you purchase through my links, at no extra cost to you. Please read full disclosure for more information.
LEVEL
Easy (see details of project levels at the Craft Yarn Council).
SUPPLIES
Yarn: Category #3 / DK / 8 ply yarn. I used Hobbii Rainbow Cotton 8/6,115yds / 1.75oz (105m / 50g) in the following colours: 2 balls of colour A: Beige (004); 7 balls of colour B: Baby Blue (032);1 ball of colour C: White (001)
Yarn for the eyes and nose: I used a small amount from 1 ball of Hobbii Rainbow Cotton 8/8, 82yds/ 1.8oz (75m /50g) of colour D: Black (009)
SUBSTITUTE YARN: Paintbox Yarns Cotton DK, 137yds / 1.8oz (125m / 50g) in the following colours:
2 balls of:
Colour A: Light Caramel (409)
7 balls of:
Colour B: Summer Sky Blue (463)
1 ball of:
Colour C: Paper White (401)
Yarn for the eyes and nose: I used a scrap amount from 1 ball of Paintbox Yarns Cotton Aran, 93yds/ 1.8oz (85m /50g) in the following colour:
Pure Black (602)
Crochet hook: 3mm (these hooks are fabulous – the yarn just glides off them!)
Scissors (super sharp… and pretty)
Tapestry needle (the bent tip makes sewing and weaving in ends much easier
Optional: Blocking mats (thick, heat resistant and come with non-rust pins too)
GAUGE / TENSION
Each square measures 4.25″ (10.75cm).
Gauge is not crucial here, but I would recommend that you keep a consistent tension so that all your squares end up the same size.
FINISHED SIZE
28.5″ x 28.5″ (72.25 x 72.25 cm) approx.
STITCHES & ABBREVIATIONS (US CROCHET TERMS)
beg – beginning
BLO – back loop only
ch(s) – chain(s)
dc – double crochet: Yarn over (yo), insert hook into stitch, yo, pull up a loop (3 loops on hook). Yo, pull through 2 loops (2 loops on hook). Yo, pull through remaining 2 loops. 1 double crochet completed.
dc2tog – double crochet two together (also known as a dc decrease): Yarn over (yo), insert hook into stitch, yo, pull up a loop (3 loops on hook). Yo, pull through 2 loops (2 loops on hook). Yo, insert hook into next st, yo, pull up a loop (4 loops on hook). Yo, pull through 2 loops (3 loops on hook). Yo, pull through remaining 3 loops. Dc2tog completed.
fasten off – To fasten off securely, work one chain, then cut the yarn leaving a 5 – 6” tail. Pull the tail through the loop that is on your hook. Tighten gently.
FLO – front loop only
hdc – half double crochet: Yarn over (yo), insert hook into stitch, yo, pull up a loop (3 loops on hook). Yo, pull through all 3 loops. 1 half double crochet completed.
sc – single crochet: Insert hook into stitch, yarn over (yo), pull up a loop (2 loops on hook). Yo, pull through both loops on hook. 1 single crochet completed.
sk – skip: Do not crochet into this stitch / space.
sl st – slip stitch: Insert hook into stitch, yarn over (yo), pull up a loop, you will have 2 loops on your hook. Pull the first loop through the second loop. 1 slip stitch completed.
sp(s) – space(es)
st(s) – stitch(es)
SPECIAL STITCHES:
EXdc- Extended double crochet: Yarn over (yo), insert hook into st or sp, pull up a loop, 3 loops on hook, yo, pull through 1 loop (3 loops remain on hook), yo, pull through 2 loops (2 loops remain on hook), yo, pull through both loops. I EXdc made.
V-st: (1dc, ch2, 1dc) worked in the same stitch
USEFUL TUTORIALS
The Extended Double Crochet Stitch (EXdc)
How to Make an Invisible Join
PATTERN NOTES
US crochet terms used throughout.
The blanket is worked in rounds.
I have modified the solid granny square slightly to ensure that the completed square is the same size as the teddy bear square.
If you need help with any part of this pattern, please see the video tutorial below.
The video is divided up into chapters, so you can jump immediately to whatever section you need.
Bear Crochet Baby Blanket In Bassinet with Teddy
PATTERN INSTRUCTIONS
TEDDY BEAR SQUARE (MAKE 13)
Teddy Bear Square
Using Colour A
Make a magic circle. (if you do not like the magic circle method, see the Alternative Round 1 below).
Round 1. Ch2 (counts as your 1st dc here and throughout), 11dc in the magic circle, sl st to top of beg ch2 to join, [12 sts].
Alternative Round 1. Ch4, sl st to 1st ch to form a ring, ch2 (counts as your 1st dc here and throughout), 11dc into the ring, sl st to top of beg ch2 to join, [12 sts].
Round 2. Ch2, 1dc in same st, 2dc in next 11 sts, sl st to top of beg ch2 to join, [24 sts].
Round 3. Ch2, 1dc in same st, 2dc in next 23 sts, sl st to top of beg ch2 to join, [48 sts].
Round 4. Ch1 (does not count as your 1st st) 1sc in same st, 1sc in next 16 sts, 6dc in FLO of next st (1st ear made), 1sc in next 11 sts, 6dc in FLO of next st (2nd ear made), 1sc in next 18 sts, to join sl st to 1st sc or make an invisible join, [58 sts].
Cut yarn, fasten off and weave in ends.
Change to Colour B
IMPORTANT: Attach your yarn to the BLO of the FIRST STITCH of the last round worked. It is important that you begin the next round in this exact stitch so that the first corner is made directly behind the ear (see photo below):
I inserted my stitch marker into the BLO of the first stitch of the last round – this is where I will attach colour B.
Correct stitch to attach yarn
Round 5. Ch3 (counts as your 1st st here and throughout), 1dc in BLO of next 2 sts, 1EXdc in BLO of next 2sts, (2tr, ch2, 2tr) in BLO of next st, *1EXdc in BLO of next 2 sts, 1dc in BLO of next 7 sts, 1EXdc in BLO of next 2 sts, (2tr, ch2, 2tr) in the BLO of the next st (directly behind the ear made up of 6dc – do not work into these 6dc)*, repeat from * to * twice, 1EXdc in BLO of next 2 sts, 1dc in BLO of next 7 sts, 1EXdc in BLO of next 2 sts, (2tr, ch2, 2tr) in BLO of next st, 1EXdc in BLO of next 2sts, 1dc in next 4 sts, sl st to top of beg ch3 to join, [15 sts on each side of square, 4 x ch2 sps].
Round 6. Ch3, 1dc in next 6 sts, *(2dc, ch2, 2dc) in ch2 corner sp, 1dc in next 15 sts*, repeat from * to * for a total of 3 times, (2dc, ch2, 2dc) in last ch2 corner sp, 1dc in next 8 sts, to join sl st to top of beg ch3 or make an invisible join (for easier seaming later), [19 sts on each side of square, 4x ch2 sps].
Cut yarn, fasten off and weave in ends.
IMPORTANT: If you used the magic circle method in round 1, make sure that you weave in the yarn tail securely so that the middle of your square does not unravel.
SNOUT FOR BEAR HEAD (MAKE 13)
Completed Snout
Using Colour C
Make a magic circle. (if you do not like the magic circle method, see the Alternative Round 1 below).
Round 1. Ch2 (counts as your 1st dc here and throughout), 11dc in the magic circle, sl st to top of beg ch2 to join, [12 sts].
Alternative Round 1. Ch4, sl st to 1st ch to form a ring, 11dc into the ring, sl st to top of beg ch2 to join, [12 sts].
Round 2. Ch1 (does not count as your 1st st), 1hdc in same st, 2hdc in next st, *1hdc in next st, 2hdc in next st*, repeat from * to * for a total of 5 times, to join sl st to 1st hdc or make an invisible join, [18 sts].
ASSEMBLY OF TEDDY BEAR SQUARE
Step 1. Embroider the nose onto the snout (I used a piece of black yarn about 20″ long).
Step 2. Sew the snout onto the teddy bear square.
Step 3. Embroider one eye on either side of the snout (cut about 10″ of black yarn for each eye).
In the video tutorial below, I show you how to do the embroidery and sew on the snout.
SOLID GRANNY SQUARE (MAKE 12)
Solid Granny Square
Using Colour B
Make a magic circle. (if you do not like the magic circle method, see the Alternative Round 1 below).
Round 1. Ch5 (counts as your 1st dc and a ch2), (3dc, ch2) into the magic circle 3 times, 2dc, sl st to 3rd ch of beg ch5 to join.
Alternative Round 1. Ch4, sl st to 1st ch to form a ring, ch5 (counts as your 1st dc and a ch2), (3dc, ch2) into the ring 3 times, 2dc, sl st to 3rd ch of beg ch5 to join.
Round 2. Ch3 (counts as your 1st dc here and throughout), *(2dc, ch2, 2dc) in next ch2 corner sp, 1dc in next 3 sts*, repeat from * to * for a total of 3 times, (2dc, ch2, 2dc) in last ch2 corner sp, 1dc in next 2 sts, sl st to top of beg ch3 to join, [7dc on each side of square].
Round 3. Ch3, 1dc in next 2 sts, *(2dc, ch2, 2dc) in next ch2 corner sp, 1dc in next 7 sts*, repeat from * to * for a total of 3 times, (2dc, ch2, 2dc) in last ch2 corner sp, 1dc in next 4 sts, sl st to top of beg ch3 to join, [11dc on each side of square].
Round 4. Ch3, 1EXdc in next 4 sts, *(2EXdc, ch2, 2EXdc) in next ch2 corner sp, 1EXdc in next 11 sts*, repeat from * to * for a total of 3 times, (2EXdc, ch2, 2EXdc) in last ch2 corner sp, 1EXdc in next 6 sts, sl st to top of beg ch3 to join, [15EXdc on each side of square].
Round 5. Ch3, 1EXdc in next 6 sts, *(2EXdc, ch2, 2EXdc) in next ch2 corner sp, 1EXdc in next 15 sts*, repeat from * to * for a total of 3 times, (2EXdc, ch2, 2EXdc) in last ch2 corner sp, 1EXdc in next 8 sts, sl st to top of beg ch3 to join or make an invisible join (easier when seaming later), [19EXdc on each side of square].
Cut yarn, fasten off and weave in ends.
IMPORTANT: If you used the magic circle method in round 1, make sure that you weave in the yarn tail securely so that the middle of your square does not unravel.
ARRANGEMENT OF BEAR CROCHET BABY BLANKET
Once you’ve made all your squares, you will arrange them before joining.
Below is a diagram showing you how I decided to arrange my squares:
Bear Blanket Arrangement of SquaresPin
JOINING YOUR SQUARES
For this blanket, I used my favourite way of joining granny squares…the flat slip stitch seam.
You can use any method you like to join your squares, but I just love the finished look and how flat the blanket lies.
You can see the photo and video tutorial for the flat slip stitch seam here
BORDER
You will now finish your blanket off with a border consisting of 7 rounds.
Using Colour B
Attach yarn to the ch2 corner sp in the top right hand corner of the blanket.
Round 1. *(3dc, ch2, 3dc) in ch2 corner sp, 1dc in each st to next ch2 corner sp, working 1 dc2tog over the ch2 sps at each seam*, repeat from * to * 4 times, sl st to 1st dc at beg of round to join.
Work 1 dc2tog over both ch2 sps at the seam area.
At the seam work a dc2tog
Round 2. (Sl st) 3 times to the ch2 corner sp, *(3dc, ch2, 3dc) in ch2 corner sp, **sk next 2 sts, V-st in next st**, repeat from ** to ** to last 3 sts before next ch2 corner sp, sk next 3 sts*, repeat from * to * 4 times, sl st to 1st dc at beg of round to join.
Round 3. (Sl st) 3 times to the ch2 corner sp, *(3dc, ch2, 3dc) in ch2 corner sp, ch1, **3dc in next V-st, ch1**, repeat from ** to ** to next ch2 corner sp*, repeat from * to * 4 times, sl st to 1st dc at beg of round to join.
Round 4. (Sl st) 3 times to the ch2 corner sp, *(3dc, ch2, 3dc) in ch2 corner sp, ch1, **3dc in next ch1 sp, ch1**, repeat from ** to ** to next ch2 corner sp*, repeat from * to * 4 times, sl st to 1st dc at beg of round to join. Cut yarn, fasten off and weave in ends.
Change to Colour A
Attach yarn to ch2 corner sp.
Round 5. Repeat round 4. Cut yarn, fasten off and weave in ends.
Change back to Colour B
Round 6. Repeat round 4.
Round 7. (Sl st) 3 times to the ch2 corner sp, *(ch3, 1dc in next ch1 sp, 5dc around the post of last dc made, 1sc in next ch1 sp) 19 times to next ch2 corner sp, ch4, 1sc in ch2 corner sp*, repeat from * to * 4 times, sl st to 1st ch of beg ch3 to join.
Bear Crochet Baby Blanket
I hope you enjoyed the pattern for this sweet bear crochet baby blanket… leave me a comment below!
Remember to pin the pattern to your board for later if you can’t make it now 😊
If you’re on Instagram, tag me in your photos of the blanket (work-in-progress or finished items) using @maisieandruth.
Happy crocheting!


0 Comments